Resmed AirSense 10 Heater Fuse Replacement; Step By Step Guide
Is your ResMed AirSense 10 ventilator’s humidifier function acting up? No worries, this problem can be fixed within minutes with just a simple sensor replacement. But before getting into the process, ensure you’ve already got some experience working with electronic devices to ensure that you do not harm the appliance in the process, and if not, please hire an electronic repair person and get the job done.
This detailed guide will walk you through the step-by-step process of replacing the heater fuse in your ResMed AirSense 10. Whether you’re troubleshooting a malfunctioning humidifier or looking to perform a complete heater plate replacement, this guide will equip you with the knowledge and confidence to restore your ventilator’s optimal functionality. Get ready to breathe easy again with our expert instructions.
What does the heater fuse do in a Resmed AirSense?

The heater fuse in a ResMed AirSense 10 ventilator is a safety component that helps protect the device and prevent overheating.
It is specifically associated with the heater plate, which is responsible for heating the water in the humidifier chamber to create the necessary humidity for the therapy. Here’s what the heater fuse does:
01. Overcurrent Protection
The heater fuse is designed to blow or “trip” if there is an electrical overload or excessive current draw in the heater circuit, and it can happen if there is a malfunction in the heating element or related components.
02. Preventing Damage
When the fuse blows, it interrupts the electrical connection to the heater plate, preventing further electrical current from flowing through the circuit. This helps prevent damage to the device or potential safety hazards like overheating or fires.
03. Safety
By breaking the circuit when there’s an issue, the heater fuse ensures the device’s and the user’s safety. It acts as a safeguard against electrical faults that could otherwise compromise the functionality and safety of the ventilator.
Replacing the heater fuse, as outlined in the previous step-by-step guide, is a necessary procedure if it becomes damaged or blown. This replacement allows the ventilator to resume proper functioning, including maintaining the desired humidity levels for therapy.
How to replace the Resmed AirSense 10 Heater Fuse?

As we’ve mentioned in the beginning, ensure you have enough experience with these simple replacements and wear rubber gloves to avoid unwanted damage to inner microelectronic parts.
Tools and Materials Needed
- TR10 Torx Security Screwdriver
- Tweezers
Step-by-step procedure
Step 1: Prepare the Ventilator
- Ensure the ventilator is turned off and disconnected from the power source for safety.
- Make sure you are working in a clean and well-lit area.
Step 2: Remove the Water Tank
- Place your thumb on the top of the water tank and your four fingers on the bottom.
- Apply medium pressure and pull straight out of the tank until it releases from the device.
Step 3: Disassemble the Ventilator
- Use the TR10 Torx Security Screwdriver to remove the four 10mm screws from the bottom of the device.
- Carefully set aside the screws for reassembly later.
Step 4: Access the Heater Plate
- After removing the screws, you will see the plastic cover. Gently remove this cover to access the internal components.
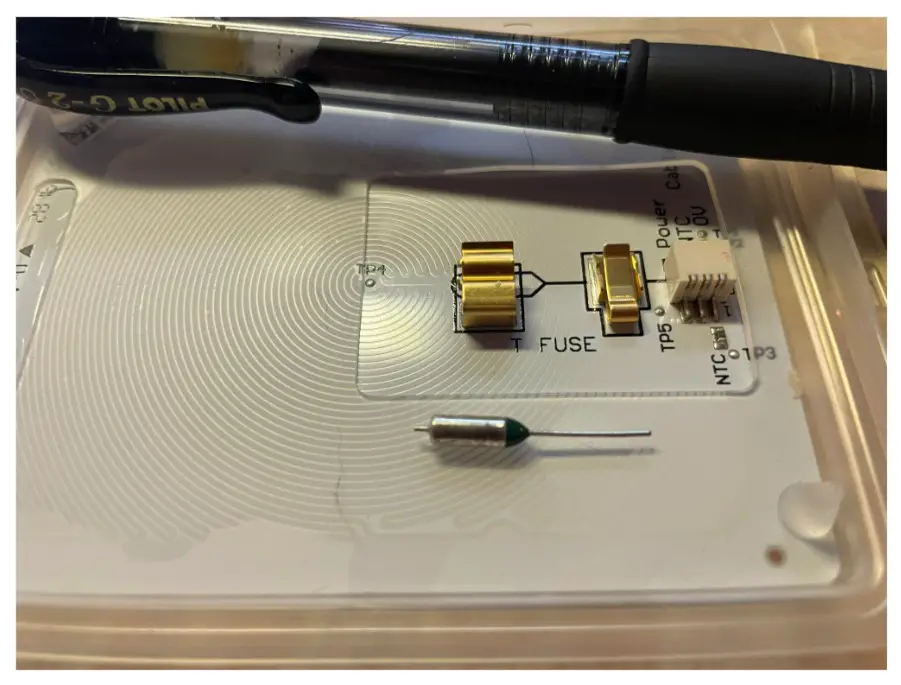
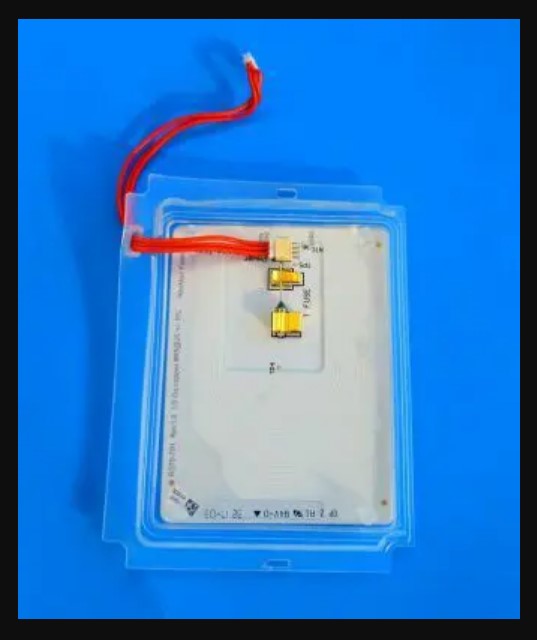
- Once the plastic cover is removed, you will have a clear view of the back of the heater plate, which houses the heater fuse.
Step 5: Disconnect the Heater Plate Power Cord
- Locate the three red cords connected to the heater plate.
- Pinch these cords and pull straight back on the heater plate power cord until it is removed from the connector.
- After removing the cord from the connector, gently pull the wires through the rubber grommet.
- Ensure the white connector at the heater plate power cords’ end touches the rubber grommet.
- With light force, push the white connector through the rubber grommet.
Step 6: Remove the Fuse
- Use tweezers with straight tips for this step.
- Locate the fuse within its housing.
- Push the fuse away from the fuse housing until the main body of the fuse becomes visible.
- Grip the body of the fuse with the tweezers and carefully pull it free from the housing. Be cautious not to bend the wire of the fuse during removal.
Step 7: Inspect and Replace the Fuse
- Examine the removed fuse to check if it is blown or damaged.
- If the fuse is damaged, replace it with a new fuse of the same type and rating. Make sure it’s inserted correctly.
Step 8: Reassemble the Ventilator
- Reverse the disassembly steps to reattach the plastic cover, secure the four screws, and reconnect the heater plate power cord.
- Slide the water tank back into place until it clicks securely.
Remember to exercise caution and take time during each step to avoid damaging components. If you encounter any issues or are unsure about any part of the process, it’s advisable to seek professional assistance or contact the manufacturer’s support.
What to do after the replacement?
After replacing the heater fuse, reconnect the heater plate power cord, insert the water tank, and power on the ventilator. Test the humidifier function to ensure it’s working correctly, monitor the device’s performance, and conduct regular maintenance.
How to Stop Christmas Lights from Blinking: Troubleshooting and Solutions
RLC talk
How to replace the Resmed AirSense 10 heater plate?
Now we’ve discussed how the fuse replacement can be done DIY, and it is time to look at the place replacement if you’re facing any problems relating to the heater plate of your Resmed AirSense.
Replacing the heater plate in a ResMed AirSense 10 ventilator is more complex than replacing the heater fuse. Here’s a simplified step-by-step guide for replacing the heater plate:
Tools and Materials Needed
- TR10 Torx Security Screwdriver
- Tweezers
- New heater plate (if required)
Step-by-step procedure
Step 1: Prepare the Ventilator
- Ensure the ventilator is turned off and disconnected from the power source.
- Work in a clean, well-lit area.
Step 2: Disassemble the Ventilator
- Use the TR10 Torx Security Screwdriver to remove the screws securing the device’s cover.
- Carefully remove the cover, exposing the internal components.
Step 3: Disconnect the Heater Plate
- Locate the heater plate, typically found near the bottom of the ventilator.
- Disconnect any wires or connectors attached to the heater plate.
- Note the orientation and placement of these connections for reassembly.
Step 4: Remove the Heater Plate
- Use the Torx screwdriver to remove any screws securing the heater plate to the device.
- Gently lift and remove the old heater plate from its position.
- If replacing the heater plate entirely, install the new one in its place.
Step 5: Reconnect and Secure
- Reconnect any wires or connectors to the new or existing heater plate.
- Ensure all connections are secure and in their correct positions.
- Use the screws you removed earlier to secure the heater plate in place.
Step 6: Reassemble the Ventilator
- Replace the device’s cover and secure it with the screws you removed earlier.
- Ensure the cover is properly aligned and tightened.
Step 7: Test the Ventilator
- Turn on the ventilator and monitor its performance.
- Verify that the new heater plate functions correctly and maintains the desired humidity levels.
Step 8: Perform Maintenance
- Regularly inspect the ventilator for any signs of issues or wear, especially around the heater plate and its connections.
Please note that heater plate replacement can be a more involved task and may require specific knowledge and tools. If you are uncomfortable performing this procedure or encounter any difficulties, it is recommended to seek assistance from a qualified technician or ResMed customer support.
Final words
Fuse and heater plate replacements in a ResMed AirSense 10 ventilator are essential maintenance procedures, and fuse replacement safeguards the device and user by preventing electrical issues and ensuring uninterrupted therapy. In contrast, heater plate replacement, crucial for maintaining optimal humidity, is vital for patient comfort and effective therapy.
When performed accurately, both procedures guarantee continued ventilator performance and safety. Routine maintenance and timely component replacements extend the device’s lifespan, providing consistent, reliable respiratory therapy and prioritizing patient well-being throughout their treatment journey.
Some related FAQs
What is the lifespan of a ResMed AirSense 10 machine?
Why is the Resmed AirSense 10 blowing air when off?
How To Jumpstart A Dead Lithium-ion Battery: Methods For Different Devices
rlc talk


