Why Arduino Port Greyed Out – How To Fix It
With the aid of the Arduino IDE, Arduino boards are programmed. One could run into many mistakes when programming an Arduino board. Although a few of these are simple to fix, some could make your programming experience a waste of time. One issue that must be fixed is an Arduino port that is grayed out. Without it, no person can use the Arduino IDE to upload code to another Arduino board.
Why Is Arduino Port Not Showing?
Failure of the USB connection is the frequent leading cause of the board not being shown on a port. A data USB cable is required to connect the board to your computer. Inspect the USB cable to help ensure that it is not broken. Test an alternative cable or your current cable with a separate device.
Take into account connecting your computer to a completely separate USB port. If possible, avoid using a hub and, in doing so, connect the board directly to your computer. Unplug everything connected to the board’s pins, particularly the 0(RX) and 1 connection (TX).
Arduino Port Greyed Out Windows 11
One of the most typical kinds of issues that users encounter is port grayed out; this indicates that the user’s PC is not detecting the Arduino board. One of the leading causes is that you are either using a knockoff Arduino board or the PC COM port drivers are improperly installed. The top three causes for why Windows 11’s Arduino port is grayed out are seen below.
- The usage of a knockoff Arduino board
- The lack of COM port drivers
- Broken USB cord
Arduino Port Greyed Out Linux/ Ubuntu
The user experience of Arduino Studio is not that good when compared to similar IDEs for other programming languages. The most irritating bug you ran with was the “Arduino Port grayed out” bug, this indicates that the Arduino port is grayed out, and you’re unable to choose anything.
Even though the device drivers have been properly loaded and are shown in the Linux/Ubuntu control panel, Arduino Studio is unable to find them or claims that the ports are already busy. Why is the Arduino port greyed out in Linux/Ubuntu? Likely reasons also for using a fake Arduino board, missing uninstalled COM port drivers, and having a broken USB cable.
Arduino Port Not Showing In Device Manager
The chance of either one or both of the USB data lines being the open circuit is very high. The most probable explanation for this is a broken cable, which can be addressed by employing a different cable, but it could also be because of damage to the USB connector or to the tracks that link the connector to the MEGA16U2 chip.
A piece of scrap metal could be shorting the programming connector on the MEGA16U2, or the device itself could be affected (the 6-pin header next to it). So, first, try using a different cable.
How To Enable Arduino Port?
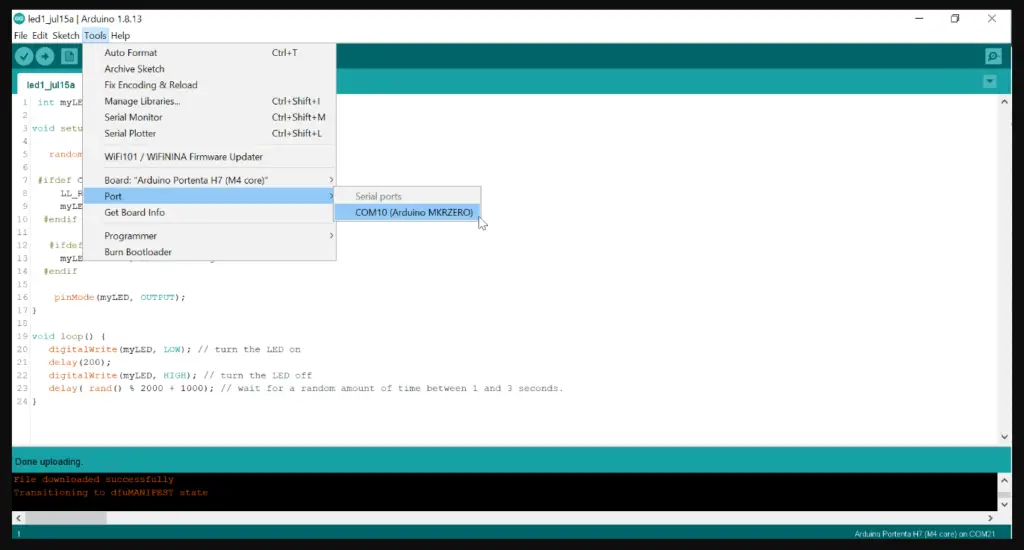
The majority of the time, upgrading the port drivers or changing the Arduino board and connecting the cable can fix an Arduino port issue. Let’sLet’s explore each option that would correct this issue.
Download the most recent Arduino port driver
Drivers not being provided for serial communication are the primary cause for ports to become grayed out. Downloading the drivers for the Arduino board is the initial step in addressing this problem. The majority of Arduino boards use FTDI chips (FT232RL) and ch340 chips for serial communication; for serial communication to start, a PC should have drivers for these two devices. Atmega16u2 and 8u2 AVR chips are used in the most recent Arduino board for serial communication.
Relying on the Arduino board chip, download any of these drivers, the CH340 chip or the FTDI chipset. Access the device manager to verify if drivers are correctly installed or not. The name of the driver has a yellow sticker alongside it. The essential driver can be found in the “COM & LPT” section. Pick Update Driver from the menu bar when you right-click the COM port driver.
Select VCP Drivers to access FTDI drivers. When a new window shows, select the second choice to search the computer for drivers actively. Choose the driver that we just downloaded now. The computer will install each needed driver when you choose one.
A notification will appear when the drivers are successfully installed, and the device manager’s yellow caution flag will vanish. To program the Arduino board, use the Arduino IDE now. Then download the Windows executable setup from the VCP section. Run the installer after downloading it, and then select Finish after the setup is finished. The Arduino board is now prepared for programming.
Arduino Board Replacement
The use of fake Arduino boards is a secondary reason why “Arduino Port Grayed Out” could occur. Because of the likelihood that it includes an unsupported chip for serial communication, the IDE won’t be able to identify the Arduino board. Always opt to get Arduino boards from approved distributors and retailers to prevent all of these problems.
Replace The USB Cable
If the Arduino IDE is having problems identifying the Arduino board, try using a different USB cable because not all USB cables are built for communication; some are designed for charging. It is suggested to use the cable that is provided with an Arduino board.
The port graying out problems might be addressed by changing the USB cable for the Arduino board. Compared to a regular charging cable, USB data cables are often larger and contain more wires. There are four wires on USB cables, two more than on a typical charging cable.
Arduino IDE Update
Consider updating the Arduino IDE as a last effort if all else fails. The most recent IDE already has chip drivers installed; we must add boards in the device manager. The official website for Arduino can be used to download it.
Error Compiling For Board Arduino/Uno: How To Fix
rlc talk
Arduino Tools Serial Port Greyed Out
When we buy a brand-new Arduino board or download any earlier version of the IDE, the Arduino tool serial port generally becomes grayed out, and Port drivers must be installed to resolve the issue. Usually, CH340 and FTDI chips (FT232RL) are employed in Arduino boards.
Downloading drivers for both chips is made much easier with the assistance of this guide. This problem could be addressed by applying various methods, such as upgrading IDE or switching out the USB cable.
How To Detect An Arduino Port?
Search “Device Manager” in the Windows Taskbar search box to access Device Manager. You can access the Device Manager window by opening the Ports (COM & LPT) list. Be certain to take notice of the port name (COM#) that shows the name of the Arduino board.
How Do I Fix The Port On Arduino IDE?
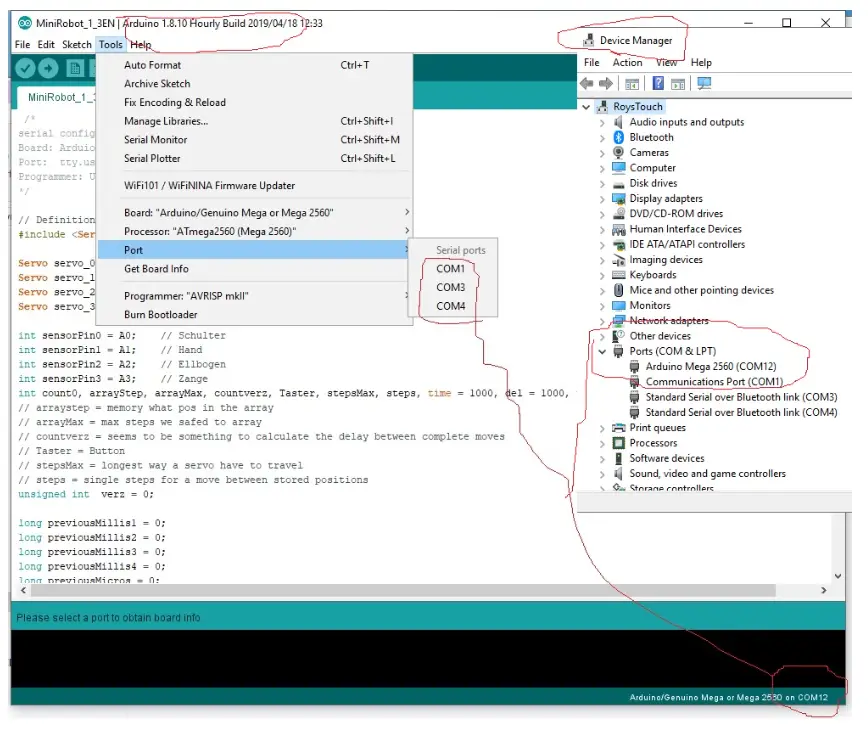
- Your board must no longer be connected to your PC.
- Tools > Port should be open to view the port listing. It’sIt’s likely that some ports are still displayed.
- Afterwards, the computer and a board should be connected.
- Open Tools > Port. It should be possible to see a new port in the list: the port to which your board is connected.
Troubleshooting a TypeError Failed to Fetch Error on Arduino
rlc talk


